

Materials:
Tigertail beading wire
2 x crimps
1 x clasp of your choice
2 x spacer beads
2 x bead tips
Jump rings for attaching and creating an extension chain
20 x silver plated spacer bars
20 x 5mm black faceted round glass beads
22 x 5mm silver-finish glass bicones
Tools:
Crimping pliers
Wire cutters
Chain nose pliers
Instructions:
1) Before we begin, organise your beads into 4 groups (10 x black, 10 x silver, 10 x black and 12 x silver).
2) Cut approximately 45cm of tigertail and fold in half.
3) Thread a crimp onto the wire and crimp it at the halfway point.
4) Thread the 2 cut ends onto a bead tip and check that the crimp is doing its job of holding the thread in place. If it's too small, take it off the bead tip and add a seed bead or another crimp. Close the bead tip.
5) Now let's start beading! Place one spacer bead onto both wire ends and then place a black bead on each separate wire end. This will begin the double row.
6) Next, add a spacer bar. The spacer bars not only add a design element, but serve to provide the bracelet with some structure and movement.
 | |
| Spacer bars will help give your bracelet some strength, structure and a slinky movement. It also stops your beads rubbing against each other, which is important for glass beads. |
7) Add another single bead onto each wire end.
8) Repeat steps 6 and 7, working through your groups of beads until you have threaded your last 2 silver beads.
9) Join the 2 wire ends by placing your other spacer bead over both ends.
10) Thread through your other bead tip (make sure it's facing the correct way).
11) Use a crimp to secure the end of the wire and then close your bead tip.
TIP: Before you secure the end with your crimp, check that you are happy with the movement in the bracelet. If it moves too stiffly, loosen it a little. If it's too limp, push the beads closer together.
12) Now let's add your clasp and chain to your bead tips. On one end, attach your clasp with a jump ring. In my design, I have used a hook.
13) Finally, join some jump rings to the other end to form an extension chain!
 |
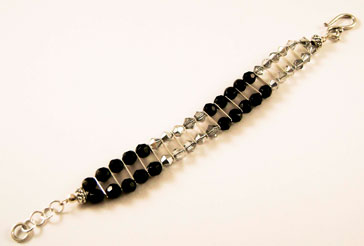
| The finished bracelet! |

No comments:
Post a Comment