
Tuesday, 12 June 2012
Chalk Pastel Ombre Hair Tutorial
Since getting rid of my blonde and pink, I have been missing my crazy coloured hair like mad. Saw the tutorial for chalking your hair and thought I'd share - at least this is a quick fix if you have a hot iron/curler. Oh pink hair, how I miss you!
For more details you can visit Kandee's blog.


Tuesday, 15 March 2011
DIY Knit: Helix Scarf

Gorgeous waves of yarn inspired by the sea. This project is one I have to try this winter. We're finally starting to see some cooler weather in Sydney, so this should be a fun one to do soon. I think this would look great in a green. You can get the Helix Scarf pattern from Knitting Daily - it's a 29 page ebook (approx 7mb).
Saturday, 12 March 2011
Limited Edition Labyrinth Worm Plush
One of my favourite childhood movies is Labyrinth. I've actually lost count of the number of times I've seen it. Yes, I've owned it on VHS (remember them?) and just recently I got it on DVD. I'm a sucker for this film, and no, I didn't have a thing for David Bowie as the Goblin King.
I wanted to be Sarah and save the little baby half brother, Toby. I wante to wear the princess dress and find my way out of the Labyrinth.
Imagine my excitement when my thinkgeek newsletter arrived in my inbox and I saw this?!

If you're not familiar with the film, you're probably looking at this plush toy and thinking "WTF is that!?" If you're a fan of Labyrinth, then you're probably salivating and thinking "How do I get me one of those?"
The toy is a giant sized version of the worm character that Sarah meets in the Labyrinth who, for some reason, has an English accent and wants her to meet the missus over a cup 'o' tea (oh, and happens to know the way through the Labyrinth, not that Sarah hears that part of the conversation). Yeah, it's a really tiny part of the movie, but Labyrinth memorabilia is so hard to come by.Here'e the scene from the film:
Well, I clicked my link in the newsletter only to find that they have sold out! Already! (sad face) Here's the link to thinkgeek site: Limited Edition Labyrinth Worm Plush
Here's hoping they restock "toot suite".
In the meantime, I found this cute Ludo coin pouch project on Cut Out and Keep:
See Labyrinth Ludo Coin Pouch and 1000's of others - or share your own on Cut Out + Keep
 |
| Love the hair, and the trippy way he played with his balls |
I wanted to be Sarah and save the little baby half brother, Toby. I wante to wear the princess dress and find my way out of the Labyrinth.
 |
| Oooh, pretty dress... Love those puffy 80s sleeves. |
Imagine my excitement when my thinkgeek newsletter arrived in my inbox and I saw this?!
If you're not familiar with the film, you're probably looking at this plush toy and thinking "WTF is that!?" If you're a fan of Labyrinth, then you're probably salivating and thinking "How do I get me one of those?"
The toy is a giant sized version of the worm character that Sarah meets in the Labyrinth who, for some reason, has an English accent and wants her to meet the missus over a cup 'o' tea (oh, and happens to know the way through the Labyrinth, not that Sarah hears that part of the conversation). Yeah, it's a really tiny part of the movie, but Labyrinth memorabilia is so hard to come by.Here'e the scene from the film:
Well, I clicked my link in the newsletter only to find that they have sold out! Already! (sad face) Here's the link to thinkgeek site: Limited Edition Labyrinth Worm Plush
Here's hoping they restock "toot suite".
In the meantime, I found this cute Ludo coin pouch project on Cut Out and Keep:
Thursday, 10 March 2011
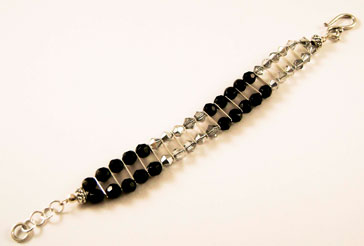
DIY: Super Quick Double Row Art Deco Inspired Bracelet
I'm a big fan of the Art Deco period so here's a bracelet project I designed that you can make in a less than an hour. Create your own with different styles of beads for a different look, or stick with black and silver for a classic style.

Materials:
Tigertail beading wire
2 x crimps
1 x clasp of your choice
2 x spacer beads
2 x bead tips
Jump rings for attaching and creating an extension chain
20 x silver plated spacer bars
20 x 5mm black faceted round glass beads
22 x 5mm silver-finish glass bicones
Tools:
Crimping pliers
Wire cutters
Chain nose pliers
Instructions:
1) Before we begin, organise your beads into 4 groups (10 x black, 10 x silver, 10 x black and 12 x silver).
2) Cut approximately 45cm of tigertail and fold in half.
3) Thread a crimp onto the wire and crimp it at the halfway point.
4) Thread the 2 cut ends onto a bead tip and check that the crimp is doing its job of holding the thread in place. If it's too small, take it off the bead tip and add a seed bead or another crimp. Close the bead tip.
5) Now let's start beading! Place one spacer bead onto both wire ends and then place a black bead on each separate wire end. This will begin the double row.
6) Next, add a spacer bar. The spacer bars not only add a design element, but serve to provide the bracelet with some structure and movement.
7) Add another single bead onto each wire end.
8) Repeat steps 6 and 7, working through your groups of beads until you have threaded your last 2 silver beads.
9) Join the 2 wire ends by placing your other spacer bead over both ends.
10) Thread through your other bead tip (make sure it's facing the correct way).
11) Use a crimp to secure the end of the wire and then close your bead tip.
TIP: Before you secure the end with your crimp, check that you are happy with the movement in the bracelet. If it moves too stiffly, loosen it a little. If it's too limp, push the beads closer together.
12) Now let's add your clasp and chain to your bead tips. On one end, attach your clasp with a jump ring. In my design, I have used a hook.
13) Finally, join some jump rings to the other end to form an extension chain!


Materials:
Tigertail beading wire
2 x crimps
1 x clasp of your choice
2 x spacer beads
2 x bead tips
Jump rings for attaching and creating an extension chain
20 x silver plated spacer bars
20 x 5mm black faceted round glass beads
22 x 5mm silver-finish glass bicones
Tools:
Crimping pliers
Wire cutters
Chain nose pliers
Instructions:
1) Before we begin, organise your beads into 4 groups (10 x black, 10 x silver, 10 x black and 12 x silver).
2) Cut approximately 45cm of tigertail and fold in half.
3) Thread a crimp onto the wire and crimp it at the halfway point.
4) Thread the 2 cut ends onto a bead tip and check that the crimp is doing its job of holding the thread in place. If it's too small, take it off the bead tip and add a seed bead or another crimp. Close the bead tip.
5) Now let's start beading! Place one spacer bead onto both wire ends and then place a black bead on each separate wire end. This will begin the double row.
6) Next, add a spacer bar. The spacer bars not only add a design element, but serve to provide the bracelet with some structure and movement.
 | |
| Spacer bars will help give your bracelet some strength, structure and a slinky movement. It also stops your beads rubbing against each other, which is important for glass beads. |
7) Add another single bead onto each wire end.
8) Repeat steps 6 and 7, working through your groups of beads until you have threaded your last 2 silver beads.
9) Join the 2 wire ends by placing your other spacer bead over both ends.
10) Thread through your other bead tip (make sure it's facing the correct way).
11) Use a crimp to secure the end of the wire and then close your bead tip.
TIP: Before you secure the end with your crimp, check that you are happy with the movement in the bracelet. If it moves too stiffly, loosen it a little. If it's too limp, push the beads closer together.
12) Now let's add your clasp and chain to your bead tips. On one end, attach your clasp with a jump ring. In my design, I have used a hook.
13) Finally, join some jump rings to the other end to form an extension chain!
 |
| The finished bracelet! |
Wednesday, 25 August 2010
That's Noice!
I know I have lots of yarn at the moment and I know I don't need more. But Lincraft have extended their 30% off yarn sale to the 29th of August. That's this Sunday! As Kath & Kim would say "That's noice, different, unusual". Oh, the temptation is so great.


Thursday, 29 July 2010
DIY Amigurumi: Baby Octopus and Coffee Cup

My amigurumi adventure continues and over the last month I have been working on a few projects at the same time. These are two of them. Enjoy!
Amigurumi Baby Octopus Pattern:

1 Ball of yarn in the colour of your choice
1 4mm Crochet Hook
Needle for embroidery and to sew the legs to the body
1 pair of safety eyes
Some yarn for embroidering the mouth
Polyfill Stuffing or stuffing from an old cushion
Head/Body:
Rnd 1: Make a magic ring with 6 sc. Use a stitch marker so you know where the start of each round is, then move it up as you go along. Note: do not join rounds.
Rnd 2: 2 sc in each sc around (Total of 12 sc in the round)
Rnd 3: *2 sc in next sc, sc in next sc; rep from * around (Total of 18 scin the round)
Rnd 4: *2 sc in next sc, sc in next 2 sc; rep from * around (Total of 24 sc in the round)
Rnd 5: *2 sc in next sc, sc in next 3 sc; rep from * around (Total of 30 sc in the round)
Rnd 6: *2 sc in next sc, sc in next 4 sc; rep from * around (Total of 36 sc in the round)
Rnd 7: *2 sc in next sc, sc in next 5 sc; rep from * around (Total of 42 sc in the round)
Rnds 8-17: Sc in each sc around.
Rnd 18: *Sc2tog, sc in next 5 sc; rep from * around (Total of 36 sc in the round)
Rnd 19: *Sc2tog, sc in next 4 sc; rep from * around (Total of 30 sc in the round)
Rnd 20: *Sc2tog, sc in next 3 sc; rep from * around (Total of 24 sc in the round)
Now attach your safety eyes and embroider a mouth before adding stuffing.
Rnd 21: *Sc2tog, sc in next 2 sc; rep from * around (Total of 18 sc in the round)
Rnd 22: *Sc2tog, sc in next sc; rep from * around (Total of 12 sc in the round)
Rnd 23: (Sc2tog) around (Total of 6 sc in the round)
Fasten off, leaving a long tail for sewing the legs on later. We'll sew on all 8 with it so make sure it's long. Weave the tail through to where you want to start attaching the legs.
Tentacles/Legs (make 8)
Rnd 1: Make a magic ring with 6 sc (use a stitch marker as before)
Rnd 2: 2 sc in each sc around (Total of 12 sc in the round)
Rnds 3-10: Sc in each sc around.
Fasten off. Hide any tails inside each tentacle.
Assembly:
Stuff each tentacle and pin to body to work out the placement. Once you have the tentacles pinned, thread your needle with your long tail from the body and start sewing.
Make sure that when you sew, you are going through the tops of each tentacle (this automatically closes one so the stuffing won't come out). Once you have completed sewing around the tentacles and come back to the start, fasten off and weave in the end into the body.
Amigurumi Coffee Cup:

What you will need:
1 Ball of yarn in the colour of your choice for the cup
Brown yarn for the coffee
1 4mm Crochet Hook
Needle for assembly
Polyfill Stuffing or stuffing from an old cushion
Coffee Cup
Using your cup colour yarn:
Rnd 1: Magic ring with 6 sc. Do not join rounds, but use a stitch marker to mark the start of each round and move up as you go.
Rnd 2: Work 2 sc in each st around (Total of 12 sts in the round)
Rnd 3: *2 sc in next st, sc in next st, rep from * around (Total of 18 sts in the round)
Rnd 4: Working through back loops only, sc in each st around (Total of 18 sts in the round)
Rnd 5: *2 sc in next st, sc in each of next 2 sts, rep from * around (Total of 24 sts in the round)
Rnd 6: *2 sc in next st, sc in each of next 3 sts, rep from * around (Total of 30 sts in the round)
Rnd 7: *2 sc in next st, sc in each of next 4 sts, rep from * around (Total of 36 sts in the round)
Rnds 8 -14: Sc in each st around.
Fasten off.
Coffee
Using your brown yarn:
Rnd 1: Magic ring with 6 sc. Do not join rounds, but use a stitch marker to mark the start of each round and move up as you go.
Rnd 2: Work 2 sc in each st around (Total of 12 sts in the round)
Rnd 3: *2 sc in next st, sc in next st, rep from * around (Total of 18 sts in the round)
Rnd 4: *2 sc in next st, sc in each of next 2 sts, rep from * around (Total of 24 sts in the round)
Rnd 5: *2 sc in next st, sc in each of next 3 sts, rep from * around (Total of 30 sts in the round)
Rnd 6: *2 sc in next st, sc in each of next 4 sts, rep from * around (Total of 36 sts in the round)
Fasten off.
Handle
Using your cup colour yarn:
Rnd 1: Make a mgic ring with 5 sc. Use a stitch marker as you go.
Rnd 2: Work 1 sc in each st around (Total of 5 sts in the round)
Repeat Rnd 2, stuffing lightly as you go, until piece measures about 7cm from beg. Fasten off.
Assembly
Fill the coffee cup with stuffing. Sew the coffee coloured top over the cup using the colour of the cup. Sew on the handle. Weave in ends.
Saturday, 10 July 2010
DIY Amigurumi: Cupcakes
Ok, I'm on a little bit of a cupcake theme today. I've been feeling pretty crook lately so I've been doing lots of resting on the couch with my crochet to stop me going crazy. And since cupcakes and sweet things make me smile. I'm going to make some crochet cupcakes! Here's the pattern I'm going to use:
Crochet an Amigurumi Cupcake - More DIY How To Projects
Crochet an Amigurumi Cupcake - More DIY How To Projects
Recipe: Cheeseburger Cupcakes
Here's an awesome recipe for today! Cupcakes that look like mini burgers! How cute are they!?
See Cheeseburger Cupcakes and 1000's of others - or share your own on Cut Out + Keep
See Cheeseburger Cupcakes and 1000's of others - or share your own on Cut Out + Keep
Monday, 5 July 2010
DIY Amigurumi: Bubble Leg Monster

There's something fascinating to me about amigurumi, perhaps it's the freedom you have with making creations and that you aren't bound by rules of what you can and can't make. I love this Bubble Leg Monster! I am having a go at it and am nearly finished. It isn't perfect, but I'm pretty happy with what I've achieved with it so far (it's a bit uneven but I think it adds to its charm :P) - I'll post up pics of my finished monster when it's done!
Edit: Thursday 29th July 2010
It's finished and looking marvellous! I used a fuschia and navy blue yarn combination for my monster, along with some pretty safety eyes. What a fun pattern to make!

Note: In the Monster pattern, you'll need to know how to do a treble crochet for the eye circle. Here's a video on how to do it:
Wednesday, 30 June 2010
Crochet Basics: Starting out, SC, HDC and DC
The cold weather has made me into a knit and crochet freak lately. I've joined up to Ravelry and have been amazed by all the wonderful patterns and creations from it's members. I highly recommend signing up there.
All the yarn talk has made me want to try my hand at more crochet, but I need to practice more first. I'm still going to try the amigurumi poo, but before that I needed a refresher on all the crochet stitches you see written in patterns. It's been so long since I've crocheted that my set is all dusty :P
Abbreviations
Here's a great video from Kim Werker that I think will help a lot of you that are starting out in crochet - It certaily helped me.
All the yarn talk has made me want to try my hand at more crochet, but I need to practice more first. I'm still going to try the amigurumi poo, but before that I needed a refresher on all the crochet stitches you see written in patterns. It's been so long since I've crocheted that my set is all dusty :P
Abbreviations
SC = Single Crochet
HDC = Half Double Crochet
DC = Double Crochet Here's a great video from Kim Werker that I think will help a lot of you that are starting out in crochet - It certaily helped me.
Friday, 25 June 2010
DIY Amigurumi: Poo Toy

Here's a cute amigurumi pattern from Naida's Crochet - Crocheted 'Poo' - I'd like to try and make this one just because it's so cute.
Edit: Thursday 29th July 2010
I've finally taken a pic of my first attempt at a happy poo! I'll admit it's really dodgy looking (I should've used brown yarn but I only had the Pink at the time, plus the tension was all over the place, so you can see the stuffing too!), but I know it will be better next time I make it :P

Wednesday, 23 June 2010
DIY Knit Project: Open Top Beanie

After getting my hands on some super bright yarn yesterday I got a bit crazy with my circular loom and made an open-top beanie. I don't know if there is a proper name for these - it's just what I have called it. The great thing about these beanies, is you can stick your hair out the top of it, or even roll the beanie if you want to use it more as earwarmers. Admittedly, my version with this yearn is a bit on the loud side - but I think it would work well in any colour you choose.
It's basically a tube - but it's nice and warm!
You'll need:

1 x Knitting Loom (I used 'Crafter's Choice' Yellow Loom with 36 pegs)
...and 50g 8ply yarn in a colour of your choice
Instructions:
- Cast on the first round: Create a slip knot and put it onto the first peg. Then continue to do e-wraps around till you get to the last peg.
- Circle the loom using Twisted Knit Stitch for 2 more Rounds. Making these first rounds like this will make your brim - I like it this way so it rolls up, but feel free to add some purl if you prefer it to sit flatter.
- Next, e-wrap the loom twice (i.e. e-wrap each loop on the loom, then go around again). You should now have 3 loops on each peg.
- Use your hook to lift the bottom 2 loops over the top loop. Repeat to complete the round.
- Repeat step 3 and 4 until you reach to desired length for your beanie. I have done 24 rounds. In the last 3 rounds, I tightened the tension a bit to make it a bit smaller at the top.
- You will notice that this technique will produce a less flexible, but more closely knit finish. There should be quite a thick texture to it (see pic below)
- Cast off the loom.
- Enjoy!

Tuesday, 22 June 2010
Nikki's Hooded Scarf Pattern
With all this cold weather upon us, I have dug up my knitting bag (full of unfinished projects) and decided that I needed to make myself a hooded scarf. I found this free pattern from Nikki, In Stitches and it has inspired me to try making one. I would still consider myself as a beginner in the world of knitting, so the pattern looks a little intimidating to me - What I need is a plain pattern but I haven't found one yet. If anyone finds one let me know!

Of course, the project gives me a good excuse to get more yarn, so I trekked down to my local kmart got some acrylic (I have several balls of beautiful wool, but I don't feel worthy of using it until my skills get better). I got:

3 x 100g 8ply Acrylic Yarn (Navy Blue, Fuschia and Red/Orange/Yellow Mix)

...and one massive 400g ball of Rainbow Mix - I couldn't resist the bright colours in it - reminds me of those rainbow paddle pops I used to eat when I was a kid (only, it's much brighter and you can wear it without getting in trouble!)


How cool is this? I want one!
Of course, the project gives me a good excuse to get more yarn, so I trekked down to my local kmart got some acrylic (I have several balls of beautiful wool, but I don't feel worthy of using it until my skills get better). I got:

3 x 100g 8ply Acrylic Yarn (Navy Blue, Fuschia and Red/Orange/Yellow Mix)

...and one massive 400g ball of Rainbow Mix - I couldn't resist the bright colours in it - reminds me of those rainbow paddle pops I used to eat when I was a kid (only, it's much brighter and you can wear it without getting in trouble!)

Wednesday, 16 June 2010
Rainbow Cupcakes!
I came across this recipe today and it made me smile! I need to go and get me some food colouring - I can't wait to try it out! If you guys try it out let me know!
Saturday, 12 June 2010
WWKIP @ A Coffee And A Yarn
I was able to sneak out of my shop for 5 minutes to check out WWKIP Day at A Coffee And A Yarn - Wow, I am impressed. These fabulous ladies were all decked out in fabulous knitted wigs out the front of the knitting cafe:


Ok - this was their zany pose for me. Here's a 'normal' shot for you:

Good on you ladies! It's great to see Knitting in Public! I love it!
I went inside and had a chat with the host of this wonderful KIP (Ellie, owner of A Coffee And A Yarn) to find out a bit more about her wonderful knitting cafe. The beautiful yarn she sells is mostly from Australia and mostly wool (no acrylic here!) or wool/cotton blends. And, it's the good stuff - No cheap crappy stuff.

You can find beautiful Alpaca wool too :D And if you're a fan of kits, she has them too! There are kits for knitting kids beanies, gorgeous tea cosies and much much more. You could spend ages in there looking and feeling the wool alone, and better yet, you can enjoy a great coffee at the same time!

And if you love knitting and crochet books they have a nice selection of them too, along with everything else you need for your project - such as crochet hooks and stitch holders.

Check out the massive vase of knitting needles by the window!! Ellie also sells some gorgeous wooden knitting needles from Tasmania that have little polka dot wooden mushrooms on the ends (I know, I should have taken a photo but with all the excitement I forgot!).
Well, there's my coverage of our local KIP - I wonder how the event is going in other parts of the world. I'd love to know. If you have any coverage, send me the link or add it to the comments!
Friday, 11 June 2010
World Wide Knit in Public Day

During 12-20th June, the world will be celebrating World Wide Knit in Public Day! If you love knitting then you should join in the fun and go to your nearest KIP (Knit In Public) day or better yet, host your own!
Up the road from my shop, at 'A Coffee and a Yarn' (a new knitting cafe at 413 King St, Newtown) they will be hosting a KIP (Knit In Public) day tomorrow from 10.30am! Unfortunately I'll be working tomorrow but I'll take some knitting with me and knit in my shop. If you see me knitting you'll now know why :P
Check out the World Wide Knit in Public Day website for more details!
http://www.wwkipday.com
Thursday, 3 June 2010
Welcome To Craft Salad

I've always loved anything crafty. And I know I'm not alone. There's a lot to be said for handmade items. There's something about the way it feels, the time, creativity and thought put into it, and sometimes even the little imperfections that make it just a little more special than something that's made in a factory.
This blog is dedicated to exploring the world of craft, and I hope to share my love of the handmade with you all. Subscribe and join me for the ride.
Subscribe to:
Posts (Atom)


